
A usable pouch drawing tells a second person where each measurement starts and ends. Put reference edges, units, feature positions and revision identity on the page before asking for approval. A sketch with three floating numbers may communicate an idea, but it cannot reliably control a repeat order.
Draw the component that is being purchased
Start with the empty pouch because that is the component the supplier delivers. Show front, back and any base or side fold needed to explain the construction. Identify the open filling edge and any existing seals. Mark features such as zipper, spout or hanging hole only when they are part of the requested pack.
Do not create a drawing by measuring a compressed photograph. Use an actual sample or a supplier-generated drawing. International Plastics' guide uses arrows to identify bag dimensions. Follow that clarity of reference while obtaining the actual construction from your proposed converter.
Choose reference edges that survive discussion
Use plain names such as bottom outside edge, left outside edge and centreline. For a feature position, state its distance from a defined reference rather than from another movable feature. If the feature itself has width or diameter, distinguish its centre position from its nearest edge.
An illustrative tear-notch note reading “20 mm below top” leaves unanswered whether “top” includes a trim margin and whether the notch centre or lowest point is being located. A marked detail view resolves that question. The example is about drawing clarity; the number is not a recommended notch location.

Create a critical-dimension register
Use this original register to keep approval effort proportional to the function of each dimension. It does not replace a supplier drawing or agreed inspection plan.
| Feature | Reference | Function | Check owner |
|---|---|---|---|
| Outside size | Defined outer edges | Component identification | Incoming inspection |
| Filling mouth | Specified opening extent | Filler access | Packing team |
| Closure position | Defined edge or centreline | Closure and customer access | Packing and design |
| Gusset | Explicit fold definition | Expansion and stance | Packaging team |
| Print-safe region | Supplier-approved boundary | Content visibility | Artwork owner |
Add a column for the agreed method and tolerance where a dimension is critical. Do not impose blanket limits merely because your spreadsheet requires a number. Ask how the feature is made and measured, then agree a meaningful acceptance condition with the supplier.
Keep drawing approval separate from filled-pack approval
A correct empty dimension does not prove customer usability or product capacity. Cross-reference the filled trial sample rather than trying to put every observation into the drawing. Record usable volume, stance and carton fit in the trial file.
GS1's package measurement standard concerns measurements of trade items under defined conditions. It is a useful separate reference when a retailer requests product dimensions. Do not mistake a trade-item data tolerance for an automatic manufacturing tolerance on an empty pouch.
Distinguish the manufactured component from the filled object
The purchased empty pouch has a defined outline and features. The filled package takes a shape influenced by its contents and condition. Put the empty component on the manufacturing drawing and cross-reference the filled observations separately. Trying to express both as one set of three dimensions can confuse order control with capacity or merchandising evidence.
State the view and measurement condition in the title or legend. For a folded sample, identify the fold's defined state. For an opened explanatory view, say that it is opened. A person reading the drawing without the sample should understand which physical distances the numbers describe.
Choose a clear datum for movable features
A datum is the reference from which a dimension is located. Use a stable, clearly defined edge or centreline for each critical feature. If a zipper moves, a notch dimension taken only from the zipper may conceal that both shifted relative to the pouch. Ask the converter which reference is appropriate for the actual construction.
For an illustrative feature centre 30 mm from a named top edge, distinguish that position from the feature's own size. The number locates the centre; it does not describe its diameter or nearest edge. The value is only an example of notation. The technical owner determines the real geometry and acceptance basis.
Add detail views where arrows become crowded
A small corner can contain a seal boundary, cut feature and artwork clearance. Enlarge that region in a labelled detail view while retaining the complete pouch view. Use a consistent legend so each line has a meaning. Do not allow technical lines to resemble printable decorative borders in the artwork handover.
Show the relation between the detail and the overall reference. A magnified feature without location can be difficult to apply. Keep units explicit and note when a view is explanatory rather than a scale drawing. Ask the supplier to resolve contradictory or redundant dimensions instead of letting production choose which one to follow.
Make criticality a functional decision
Identify the drawing owner who can resolve an interpretation. Procurement should not alter a structural reference independently when a supplier raises a question. A marked proposal can start the discussion while the accepted drawing remains clearly controlled.
Identify why a dimension matters. It may locate the filling opening, preserve a closure region, align a graphic or meet an external fit requirement. The function helps the team agree an appropriate measurement and acceptance condition. Do not apply an identical limit to every dimension merely because it is easy to put in a spreadsheet.
Procurement can ask the converter and receiver to agree the critical register. The resulting plan should be practical to measure and relevant to use. If a requested limit cannot be supported, ask for a technical discussion rather than inventing a capability figure. Record the accepted requirement and its owner.
Compare a sample against the same reference
When a sample arrives, use the current drawing and agreed measurement points. Record the sample identity and condition. A sample can look similar while differing at a feature that matters to filling or artwork. Conversely, a visual difference may need clarification before it is classified as nonconforming.
Photograph a disputed measurement with the reference edges visible, and retain the actual reading in the record. Do not derive a precise dimension from a compressed image or a tilted ruler. If buyer and supplier used different conventions, resolve the interpretation before treating the disagreement as a manufacturing failure.
Use a change cloud with a written description
For a revision, mark the affected area and describe what changed. Include consequences that the converter proposes, such as moving an adjacent feature. A changed height can alter more than one relationship, so the revision should not hide secondary adjustments. Ask affected owners to review the current set together.
The change mark is a communication aid, while the revised dimensions control the new geometry. Retain the previous revision as a record with its obsolete status clear. Do not overwrite the only accepted baseline before the change has been reviewed and the current file is unambiguous.
Release a file that purchasing can retrieve
The order reference should identify the accepted drawing number and revision. The supplier acknowledgement should refer to the same item. Keep the controlled drawing separate from preliminary sketches, while retaining the history through the organisation's procedure. A filename alone should not carry all the information needed to select the correct version.
At a repeat order, confirm that the current drawing still matches the product and filling brief. If another destination or packing site introduces a new interface, assess it explicitly. The useful drawing is a durable description of the component, with enough context for procurement, the converter and the receiver to discuss the same feature without reconstructing an old conversation.
Pouch drawing: a practical specification example
A 250 g target is written on a brief before the product volume is known. Weighing the contents alone does not establish a pouch size: loose bulk, settling, shape and headspace all affect the usable cavity. A tall narrow pack and a wider shallow pack can have different handling and display characteristics. Compare filled samples before translating one reference into a new format.
For this decision, start with the front, side and base views. The useful output is the same dimension names used by buyer and supplier. Put that output beside the relevant quotation, drawing or sample rather than leaving it in a separate email. This is an illustrative decision exercise, not a report of a completed customer trial.
Product references to make the discussion concrete
The catalogue includes flat-bottom pouches and side-gusset pouches. These examples show different physical constructions; they are not interchangeable specifications. A box-style base gives the filled pack a distinct footprint, with separate front, back and side panels. Compare a plain top opening with a regular zipper, and use filled samples to decide the shelf depth and panel proportions.
| Format reference | Material or construction to clarify | Details to include in the brief |
|---|---|---|
| Flat-bottom pouches | Flexible laminate with paper-look or opaque outer options; the appearance alone does not identify the full layer structure. | Base width and full opened depth; net fill and product bulk. |
| Side-gusset pouches | Paper-look and opaque or foil-look laminates are illustrated; confirm the actual inner and outer layers for the contents. | Face width and side-gusset convention; filled height and headspace. |
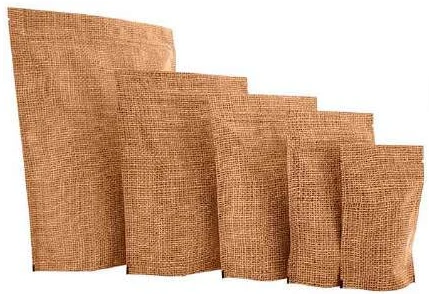
Use the reference pictures to identify the base, side panels, window or opening that you mean. A picture cannot supply the missing dimensions or material layers. If a photograph shows a finish or closure you do not want, state that difference explicitly; otherwise a visual reference can introduce an unintended requirement.
Complete the record before requesting the next sample
- Attach the same dimension names used by buyer and supplier. Identify the product or SKU and the date of the observation.
- Record the front, side and base views. Keep confirmed information separate from proposed values and questions for the supplier.
- Add the actual fill weight or volume, the dimension convention, material proposal and intended closure. Include the number of designs and quantity per design when requesting a quotation.
- State which question the next drawing, sample or quotation must resolve. A change of size, closure or material should remain visible alongside the earlier reference.
This record makes the next conversation specific. It lets the design, purchasing and packing teams work from the same proposed item and shows which decision still needs evidence. Review the related product pages for format details, or prepare a custom packaging brief with the unresolved requirements.

Release a single controlled file
Put the drawing number, revision, date, units and approval roles in a title block. Mark whether the drawing is for enquiry, sampling or production release. Procurement should attach the released version to its order and remove superseded files from the working approval folder without destroying the audit trail.
When a discrepancy appears, identify the feature and reference on the drawing. Ask for a marked revision rather than accepting a verbal correction. Check whether artwork, filling trials or carton information also need updating. For a new enquiry, send Navkar Poly Print the existing sample, the critical-dimension register and the intended packing interface so the technical drawing can be reviewed before commercial release.
Sources and scope.
These references support the technical discussion. Product photographs illustrate formats; the material, dimensions and suitability of the proposed pack are confirmed for each project.
- International Plastics: side-gusset bag measuring guide
Illustrated external dimensions and dimension-order notation.
- GS1 Package and Product Measurement Standard
Distinguishes measurement treatment for different filled flexible-pack types; does not set converter tolerances.
Let’s discuss your product.
Share your contents, dimensions, filling method, quantity and delivery destination. We’ll work through the proposed packaging specification with you.
Create a packaging brief