

Approve a pouch diecut through a controlled drawing and agreed acceptance criteria. Review contour, feature positions and functional clearances together; do not assume a print proof or hand-cut mock-up establishes the production geometry or its allowable variation.
Identify the geometry under review
Use a drawing revision with defined datums, units and measurement conventions. Mark outline, cuts, holes, corners, opening features and relevant seal boundaries. Ask the converter to identify feasible geometry and the proposed criteria for technical agreement rather than inserting guessed tolerances.
Keep critical content and product space on separate review layers. A contour change can alter both usable space and artwork placement. Make the affected decisions visible before asking approvers to sign a revised outline.
Agree what will be measured
Record the feature, reference points, measurement method and accepted criterion as agreed by the competent teams. Include how samples will be identified and which production stage they represent. An unlabeled sample cannot reliably serve as a later dimensional reference.
SEE's three-side-seal sheet and Craftz's gusseted construction page provide format context only. Your contour and feature acceptance must refer to the actual project drawing and application.
Keep visual acceptance and dimensional acceptance distinct
Record whether reviewers accept the appearance of the outline, its measured geometry or its interaction with contents and fixtures. These are related but different questions. A preferred silhouette can still have an unresolved loading, hanging or opening requirement.
Distinguish nominal geometry from acceptance
Nominal geometry describes the intended shape. Acceptance criteria describe how the relevant features are evaluated and what decision follows. Keep these in separate fields so a dimension is not mistaken for a fully agreed inspection requirement. Ask the converter to identify feasible geometry and proposed variation for technical discussion. The buyer's competent reviewers should consider the actual application and measurement approach before accepting a criterion.
Define the reference system on the drawing. Mark the origin, orientation, units and any named edges used to locate features. State whether a dimension refers to an outer cut, a seal boundary or another agreed reference. If the sample is flexible, the condition used for measurement also needs agreement. Different preparation or positioning can make apparently conflicting readings difficult to interpret. Record the method rather than asking reviewers to measure until the figures agree.
Review connected features as a system
List the functional relationships affected by the contour: product space, loading access, opening path, hanging engagement, seal position and artwork area. A dimension can be acceptable individually while its relationship with another feature still needs review. Ask which interfaces are critical to the intended task. Mark them clearly on the drawing and link each to a requirement owner. This helps the team concentrate evidence on the consequences that actually matter.
Thomson's shaped-pouch page describes custom shape and die development in its own offering. It supports treating the contour as a controlled development input. It supplies no general tolerance or proof that a proposed design is feasible at another converter. Request the actual project proposal and keep any production capability statement specific to the supplier and evidence that issued it.
Specify how a feature will be checked
For each agreed feature, record the drawing reference, sample identity, measurement points, method and acceptance criterion. Identify the responsible evaluator and how the result will be recorded. If a tool or fixture is required, reference the accepted procedure rather than naming equipment casually in an email. The purpose is to make a later check interpretable. A number without its method and condition may not be comparable with the development record.
If the result is close to a decision boundary, follow the buyer's agreed technical procedure. Do not average unrelated readings, select the most favourable sample or infer a universal allowance from the instrument display. Ask the competent owner to assess the measurement evidence and its limitations. Procurement should preserve the record and obtain the decision, rather than create an improvised tolerance to keep a purchase order moving.
Separate appearance from functional evidence
A hand-cut model may help a designer assess a silhouette. It does not reproduce a production cutting operation. An unfilled sample may show an outline but leave loading and filled-panel questions unresolved. A printed proof may establish the intended graphic position while leaving physical feature coordinates outside its scope. Identify these differences before review and ask each approver to state the question their sample can answer.
Use separate rows for visual acceptance, measured geometry and functional interaction. Link them through the same candidate reference. This prevents an attractive appearance decision from being used as a substitute for dimensional acceptance. It also allows progress when one review is complete and another is legitimately pending. The release record should make that state understandable to the production and buying teams without a long reconstruction of the development conversation.
Work through a local contour revision
Consider an illustrative request to deepen a side recess after the first loading observation. Highlight only the changed zone on the old and new drawings. Ask whether it affects the product envelope, entry route, seal relationship, graphic area or fixture interface. Give each affected requirement to its owner. Some evidence may remain applicable if the relevant conditions are unchanged; record the owner's reason rather than assuming either complete reuse or complete retesting.
If the new contour is accepted, give it a new revision and state the effective candidate. Update artwork and sample requests using that reference. Label old photographs with their actual revision. A presentation showing the newest outline beside an earlier filled prototype can otherwise conceal an evidence mismatch. The change register should connect the reason, revised geometry, affected decisions and closure evidence in a short sequence another reviewer can follow.
Handle conflicting drawings before inspection
If the supplier and buyer hold different versions, stop comparing samples against an uncertain reference. Identify the controlled source, compare the revisions and ask the responsible owner to reconcile the difference. Preserve both versions in the history, but issue one active drawing for the next decision. An informal mark-up can communicate a proposal; it should not become the production reference without the agreed release process.
Check exported files for scale and layer identity. A drawing reproduced inside a slide or resized PDF image may be useful for discussion but unsuitable for measurement. State the governing dimensioned file and use its revision consistently. If a feature is absent from an export, return it to the drawing owner instead of recreating it from a photograph. The time spent clarifying the reference protects the meaning of every later measurement.
Retain a complete acceptance packet
Keep the released drawing, agreed criteria, sample references, observations and decisions together. Identify which questions remain open and who owns them. Include the relationship to artwork and the intended contents task. This packet lets a repeat-order reviewer distinguish an unchanged contour from a proposal that needs another assessment. It also helps explain why a previous visual approval does not automatically cover a new feature or altered outline.
At reorder, compare the active references before relying on the retained sample. If the drawing, material, contents or use condition has changed, route the affected question through the buyer's procedure. The aim is a reproducible diecut decision based on identifiable geometry and suitable evidence, with no guessed universal tolerance and no ambiguity about which outline governs the order.
Illustrative revision exercise
Imagine a shaped pouch where marketing requests a deeper side contour after the loading trial. Mark the changed area on an overlay and identify affected product space, seal references, artwork and fixture clearance. Ask each owner whether their prior acceptance remains applicable. If the change is accepted, issue a new drawing and prevent the old outline from remaining the active production reference. Keep both the reason and decision in the register. This makes the next prototype purposeful and avoids treating a small-looking visual change as automatically irrelevant to every functional requirement.
A working record for this decision
Use this original worksheet with your product and supplier team. Give each row a named owner and evidence reference; a blank answer remains an open decision.
| Record | What to enter and why |
|---|---|
| Drawing identity | Record contour revision, datums, units and the features included in the diecut review. |
| Measurement definition | List reference points, method and acceptance criteria agreed by the technical reviewers. |
| Functional clearances | Link cuts and features to contents, loading, opening, seals and display fixtures. |
| Sample reference | Identify sample construction, production stage and the questions it can support. |
| Change register | Document contour changes, affected approvals and the active released drawing. |
Die-cut artwork: a practical specification example
A special retail profile must still provide a usable cavity and a practical opening. A hanging header, die-cut outline or carrying feature occupies material that cannot automatically be counted as product space. Start with a drawing of the actual product envelope, then place the feature and the artwork. Compare the filled pack on the intended fixture rather than judging only the flat silhouette.
For this decision, start with the cut line, seal area and corners. The useful output is critical text placed inside the confirmed usable face. Put that output beside the relevant quotation, drawing or sample rather than leaving it in a separate email. This is an illustrative decision exercise, not a report of a completed customer trial.
Product references to make the discussion concrete
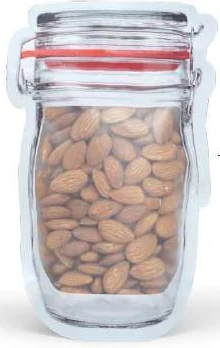
The catalogue includes jar-shaped zipper pouches and hanging display pouches. These examples show different physical constructions; they are not interchangeable specifications. A contoured outline gives the pouch a jar-like silhouette while retaining a flexible pack construction. The narrow shoulder and top opening affect filling and access. Review the usable cavity, zipper length and artwork boundaries on a dimensioned drawing before committing to the shape.
| Format reference | Material or construction to clarify | Details to include in the brief |
|---|---|---|
| Jar-shaped zipper pouches | Clear or frosted flexible pouch construction with a zipper; the jar shape is a profile, not a rigid container. | Usable cavity and narrowest opening; die-cut outline and corner radii. |
| Hanging display pouches | Clear or opaque flexible pouch construction with a punched hanging feature; final material and reinforcement are reviewed for the fill. | Retail hook and hole dimensions; filled weight and hanging orientation. |
Use the reference pictures to identify the base, side panels, window or opening that you mean. A picture cannot supply the missing dimensions or material layers. If a photograph shows a finish or closure you do not want, state that difference explicitly; otherwise a visual reference can introduce an unintended requirement.
Complete the record before requesting the next sample
- Attach critical text placed inside the confirmed usable face. Identify the product or SKU and the date of the observation.
- Record the cut line, seal area and corners. Keep confirmed information separate from proposed values and questions for the supplier.
- Add the actual fill weight or volume, the dimension convention, material proposal and intended closure. Include the number of designs and quantity per design when requesting a quotation.
- State which question the next drawing, sample or quotation must resolve. A change of size, closure or material should remain visible alongside the earlier reference.
This record makes the next conversation specific. It lets the design, purchasing and packing teams work from the same proposed item and shows which decision still needs evidence. Review the related product pages for format details, or prepare a custom packaging brief with the unresolved requirements.

Put the decision into practice
1. Freeze the drawing basis. Agree the geometry and measurement conventions before reviewing production samples.
2. Set accepted criteria. Have competent teams confirm feasible tolerances and the measurement approach.
3. Review function and appearance. Check contents, fixtures and panel placement alongside measured feature positions.
4. Release one active revision. Retain the decision history and identify the current contour for artwork and production.
Share the controlled contour drawing and proposed acceptance record with Navkar Poly Print before approving a specialty pouch diecut.
Sources and scope.
These references support the technical discussion. Product photographs illustrate formats; the material, dimensions and suitability of the proposed pack are confirmed for each project.
- SEE: Three Side Seal Pouches
Manufacturer format reference for a three-side sealed pouch; supplied features and suitability are not transferred to Navkar.
- Craftz: four-side seal pouches with gusset
Manufacturer format example demonstrates why drawings are needed to distinguish seal and gusset constructions.
- Thomson Printing & Packaging: Shaped Pouch
Manufacturer describes shaped contours and custom die development; no performance or equipment capability transferred to Navkar.
Let’s discuss your product.
Share your contents, dimensions, filling method, quantity and delivery destination. We’ll work through the proposed packaging specification with you.
Create a packaging brief